Reseller Hosting – Getting Started
In this article you will find all the basic information on where to start from with our Reseller Hosting Service.
The following items are to be explained here:
1. Package Information
– Welcome Guide Email
– Email with Addons
2. Preparing Domain Name
– How to manage Personal Nameservers
3. Preparing Reseller Account. Description of WHM main functions
– How to use Feature Manager in WHM
– How to create new package in WHM
– How to create new cPanel Account in WHM
– How to change password/contact email address for a cPanel account in WHM
– How to change package for a particular cPanel account in WHM
– How to edit Resource Limits in WHM
– How to edit DNS Zone of a particular Domain Name in WHM
4. WHMCS Billing Platform
– How to install WHMCS
– dream line it solution Domain Registration module in WHMCS
* Module Configuration
* General Settings
* Domain Sync Mode
* Debug Mode
– Dream Line IT Solution SSL Certificates module in WHMCS
PACKAGE INFORMATION
Welcome Guide Email
Once your Reseller Hosting account is activated, you will receive Welcome Guide Email containing the information about your hosting package, including WHM/cPanel access details, Addons, FTP details and other important references.
You can check an example of such email right here.
Email with Addons
If you choose some additional services for your hosting account, or in case some of them are included into the package already like SSL Certificate or Private Nameservers, you will receive additional email message containing the detailed information about them, for example IP addresses for Private Nameservers etc.
You can also take a look at an example of such email message here.
NOTE: a number of Addons may vary depending on the type of Reseller package you choose.
You can check available Reseller Hosting packages here: https://www.dreamlineit.com/.
To view full technical specification of the package, click on Tech Specs tab at the bottom of the page
PREPARING DOMAIN NAME
Once the hosting account is active, you will need to point the domain name to our nameservers or Personal Nameservers if such are included into the package. You will find nameservers in the Welcome Guide email after the package activation.
How to Manage Personal Nameservers
If you have Personal Nameservers included into your hosting package, you will need to register and set them on the side of your Domain Name Registrar.
In case the domain name is registered with Drea, Line IT Solution, use this tutorial to create Personal Nameservers.
NOTE: IP Addresses for Personal Nameservers are also provided in the Welcome Guide Email.
Once registered, you can set them for your Dream Line IT Solution domain following the guide here.
PREPARING RESELLER ACCOUNT.
DESCRIPTION OF MAIN WHM FUNCTIONS
Once you receive Welcome Guide email and get access to WHM, you can start learning WHM basics and get a few things done. Find the description of main WHM functions below.
How to use Feature Manager in WHM
Feature Manager is an interface that allows to create a list of features that will be available for particular cPanel accounts.
In order to create a specific Feature List, do the following:
1. In WHM navigate to Feature Manager menu in section Packages
2. Type in the name of the list you wish to create next to Feature List Name field and click on Add button
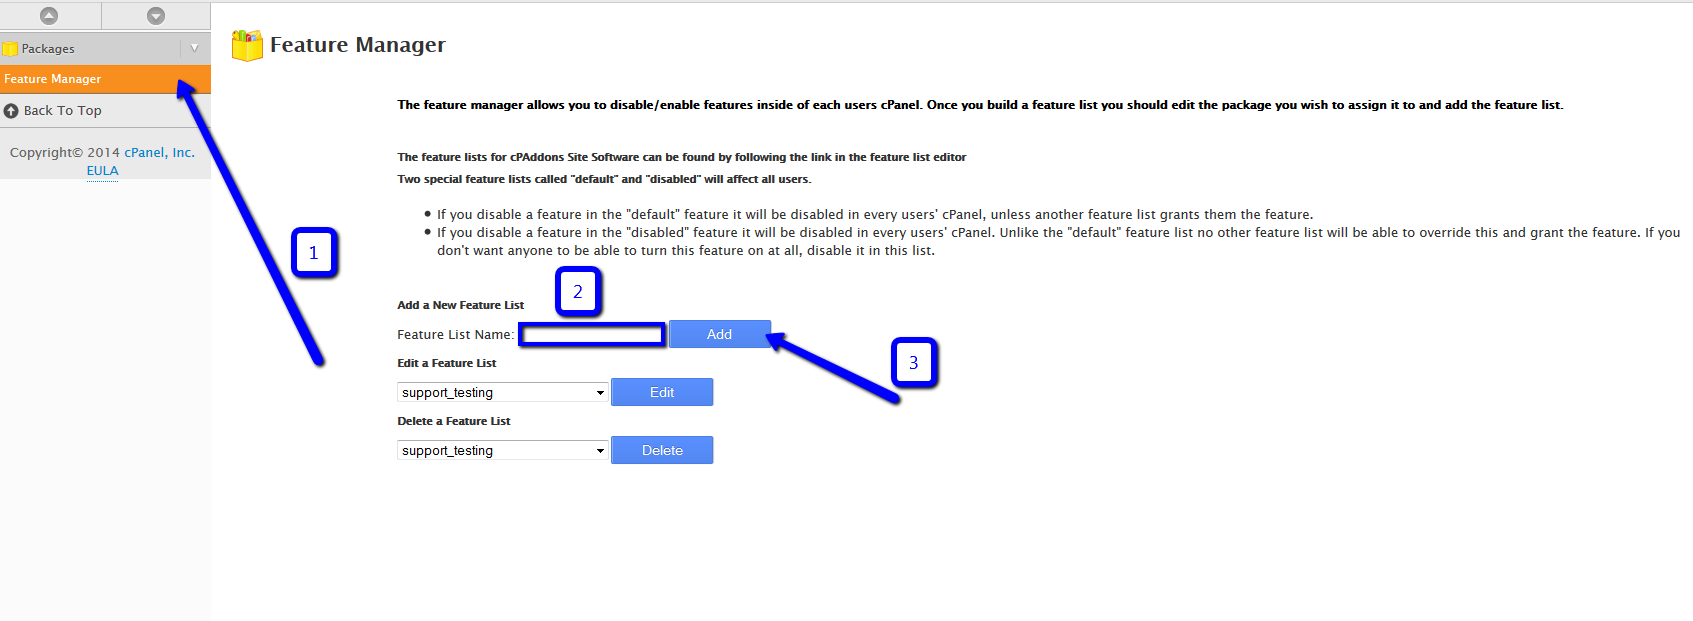
3. Once done, choose the newly created list from the drop-down menu next to Edit a Feature List field and click on Edit button
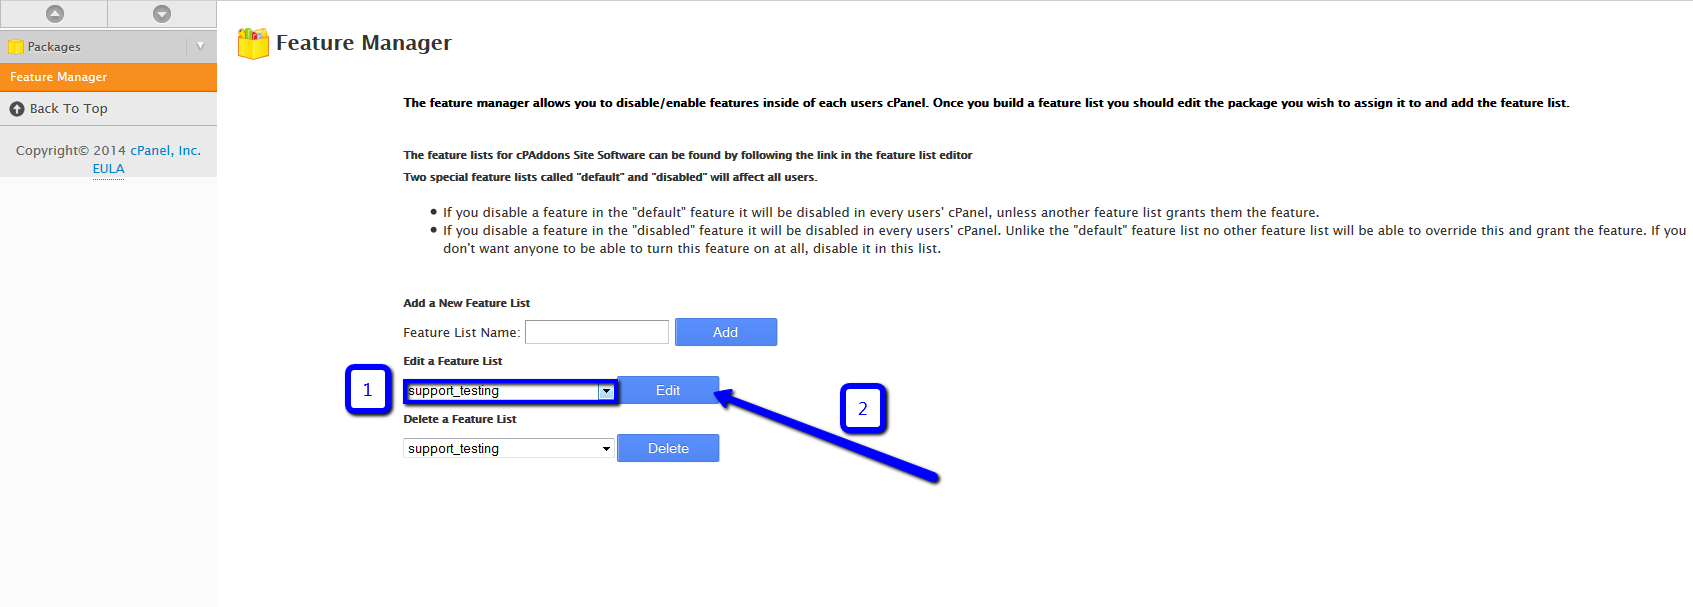
4. You will be forwarded to the list of features available on our server. Simply pick-up required ones and click on Save at the bottom of the page.
How to create new packages in WHM
A hosting package is simply a set of functions, limitations and resources each cPanel account may have within Reseller Hosting Account. Basically having different packages with different set of functions and limitations allows to provide a range of Hosting Accounts based on particular features.
NOTE: It is recommended to configure a hosting package prior to creating new cPanel account in WHM to simplify further cPanel accounts management process.
To create a new package in WHM you will need to do the following:
1. Log into WHM using http://domain.com/whm or https://hostname_server/whm
2. Navigate to Add a Package menu in section Packages
3. Set appropriate quotas in Resources section
4. Choose required settings for the package in Settings, including Feature List
5. Click on Add button

How to create new cPanel Accounts in WHM
In order to create a fresh cPanel account in WHM you need to do the following:
1. In WHM navigate to Create a New Account menu in Account Functions
2. Fill in the gaps and choose appropriate settings in the following sections:
* Domain Information
* Package Settings
* DNS Settings
* Mail Routing Settings
3. Click on Create button
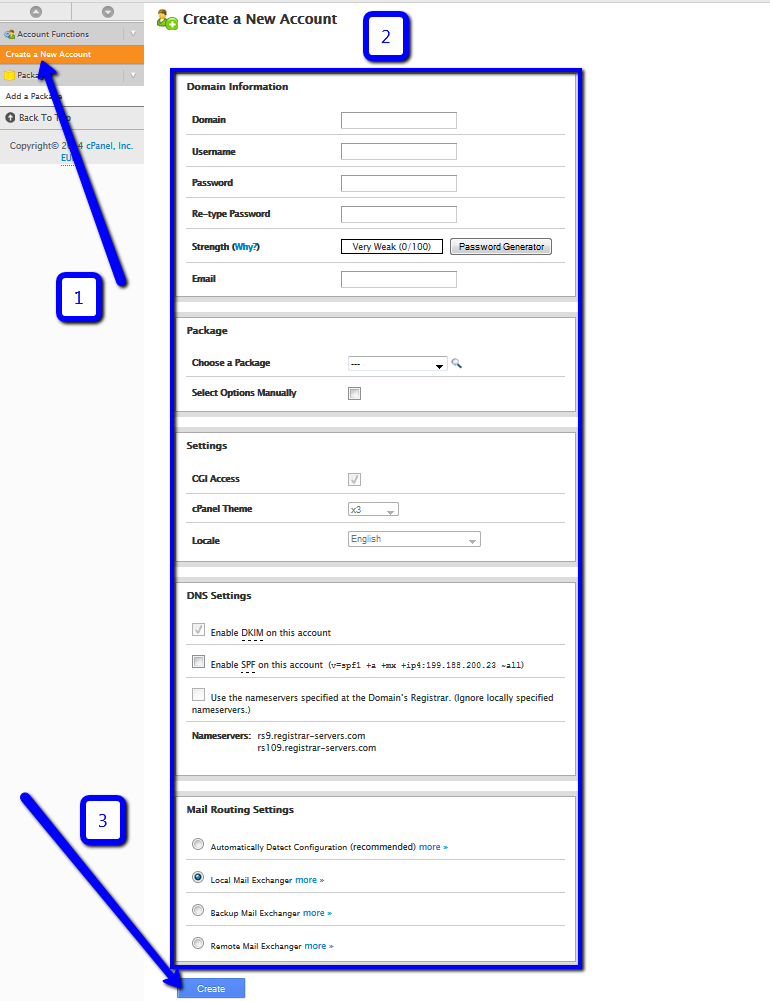
For more detailed and illustrative explanation feel free to refer to our video tutorial here.
How to reset password/contact email address for a cPanel account in WHM
If you need to change password or a contact email address for a particular cPanel account, you can do this in the following way:
1. Navigate to List Accounts menu
2. Click on “+” next to cPanel account you need to change the information for
3. Change password or email account in corresponding fields and confirm by clicking on Change

How to change package for a particular cPanel account in WHM
In order to change package for a cPanel account you will need to do the following:
1. Navigate to Upgrade/Downgrade an Account menu
2. Choose the account you wish to upgrade/downgrade in Account Selection and click on Modify button

3. In the next windows you will need to choose the required package from Available Packages list and click on Upgrade/Downgrade button

Feel free to use our video tutorial for more illustrative example here.
How to edit Resource Limits in WHM
Resource Limits is a WHM function that allows to allocate available system resources to cPanel users. It may be useful in order to prevent some accounts from overusing server resources.
Apart from resource limits stipulated by a Package, it is possible to adjust the limits for a cPanel account particularly. This can be done in the following way:
1. In WHM navigate to Modify an Account menu
2. Choose the account you wish to adjust the limits for in Account Selection field and click on Modify button
3. You will be forwarded to account modification window and specific resources can be adjusted in Resource Limits section accordingly.
How to edit DNS Zone of a particular Domain Name in WHM
A DNS Zone is an administrative portion of DNS settings that belongs to a domain name.
In other words, every domain name has certain DNS settings and in order to keep them all together, DNS Zone file was designed. A DNS Zone can be easily edited via WHM >> Edit DNS Zone menu.
To edit DNS Zone, follow the steps below:
1. In WHM navigate to Edit DNS Zone menu on the left-side bar
2. Choose the account you wish to adjust the settings for in Choose a Zone to Edit list and click on Edit button

3. You will be forwarded to DNS settings modification window were different DNS records types including: A, CNAME, TXT, SOA, NS, MX etc. can be adjusted accordingly
More details on this tool can be found here.
WHMCS BILLING PLATFORM
We highly recommend using Softaculous script-installer as it is the easiest and the most convenient way to install WHMCS Billing platform in a few clicks. Furthermore, Softaculous is included into Reseller Hosting Account by default and is integrated into cPanel.
Feel free to check our video tutorial that explains how to install WHMCS using Softaculous script-installer here.
Dream Line IT Solution Domain Registration module in WHMCS
dreamlineit.com WHMCS Registrar module is an open-source plug-in provided free of charge. It was specifically designed with the purpose of integrating Dream Line IT Solution as Domain Registrar into WHMCS platform.
NOTE: you can alternatively use built-in Dream Line IT Solution Registrar module in WHMCS, however we highly recommend using our own module due to constant updates, implementation of new features and advanced functionality.
You can download the plug-in right here and install it following the instructions provided on the same page.
Module Configuration
To access module configuration settings, follow the steps below:
1. Log into WHMCS Admin panel
2. Navigate to Setup >> Products/Services >> Domain Registrars menu

3. In the list of Domain Registrars available, find Dream Line IT Solution and click on Configure button. You need to indicate the following information there:
– Username: your dreamlineit username
– Password: dreamlineit API key. To get it, you need to log into dreamlineit Account, mouse over your dreamlineit username >> Manage Profile >> API Access menu
– PromotionCode: here you can use Domain Registration Promo Code. Available promo codes can be checked here.
NOTE: In order to have API enabled for your account, you should meet one of the following requirements:
– have at least 20 domains under your account;
– have at least $50 on your account balance;
– have at least $50 spent within last 2 years.
Still, you are free to test our API through the Sandbox environment at www.sandbox.dreamlineit.com
It is also possible to run WHMCS in a test mode. This is useful to test how the configured system will work prior to making it available for public. For this you may register Sandbox account and get corresponding access details here.
* SandboxUsername: Your Sandbox Username here
* SandboxPassword: Sandbox API key. Sandbox API Key can be retrieved in the same way as Dream Line IT Solution API key right here
* TestMode: by choosing this option, all the APIs will be forwarded to Sandbox environment using corresponding Sandbox Credentials
* DebugMode: this option allows identify and investigate issues with remote API systems. It will make a record of all the API calls sent to the Registrar and all the responses sent back.
General Settings
General Settings of the module are available in WHMCS Admin panel >> Setup >> General Settings menu >> Domains tab

Here you can adjust different Domain related settings to make domain registration process even more comfortable for your customers:
*Enable Renewal Orders – this option allows domain renewals from WHMCS client’s area
*Auto Renew on Payment – with this settings enabled, the system will automatically renew domain names in WHMCS after the payment is processed
*Auto Renew Requires Product – only free domains with corresponding active service (hosting account, email subscription, etc) will be auto-renewed
*Default Auto Renewal Setting – this option will auto-generate invoices for expiring domain names. This also can be adjusted for every domain name particularly in Clients >> Domain Registrations >> choose the domain name >> select Disable Auto Renew setting
*Domain Sync Enabled – enables automated synchronization with Domain Registrar
* Domain Sync Notify Only – the synchronization with Domain Registrar will not be performed automatically; email notifications will be sent to Admin instead
* Allow IDN Domains – this setting will disable A-Z; 0-9 cross-check character validation for domain names entered via WHMCS client area
* Bulk Check TLDs – this option includes TLDs that you want to check in addition to the TLD the client selects during the order
* Use Clients Details – this setting allows to specify the details/information that will be publicly displayed during WHOIS lookup for the domains registered through WHMCS
More information on additional options can be found here.
Domain Sync Mode
Domain Sync Mode allows to setup synchronization between WHMCS module and Domain Name Registrar to keep all the domain related information up-to-date. This includes any domain name status changes, renewals, expiration dates etc.
To enable this feature, simply navigate to Setup >> General Settings >> Domains and tick Domain Sync Enabled option

Once this is done, you will need to setup a Cron Job which will be responsible for synchronization in Reseller’s cPanel account. To do this, simply follow the steps below:
1. Log into Reseller’s cPanel account: http://domain.com/cpanel or https://hostname_server/cpanel
2. Click on Cron Jobs menu under Advanced section

3. In Common Settings section choose “Once a week” option and insert the following string to “Command” field:
/usr/bin/php /home/cpanel_username/public_html/path_to_WHMCS/crons/domainsync.php
NOTE: make sure to replace “cpanel_username” part with your actual cPanel username provided in the Welcome Guide email and “path_to_WHMCS” with the actual path to your WHMCS installation.

That’s it! The sync mode is configured now and all the domain name related information will be synchronized with WHMCS system.
Debug Mode
Debug Mode feature allows to identify and investigate any issues with API systems, recording and displaying output results of all the API calls sent to the Registrar and all the responses received back.
NOTE: it is highly recommended to enable Debug Mode only in case of any issues with Module behavior. Make sure not to have it enabled permanently as it will result in massive log archives on the server side which will take a good part of disk space.
To enable Debug Mode, go to Setup >> Products/Services >> Domain Registrars

Next to Dream Line IT Solution click on Configure button and select DebugMode option there. Then click on Save Changes to confirm

In order to enable/disable debug logging and view the logs, you will need to open Utilities >> Logs >> Module Log menu

You will find Enable/Disable Debug Logging and Reset Debug Module Log buttons there

All the API calls will be listed in Request field and all the responses from the remote system can be found in Response field correspondingly.
Dream Line IT Solution SSL Certificates module in WHMCS
dreamlineit.com WHMCS SLL Certificates plug-in is an open-source plugin that is provided free of charge. The module is fully integrated with Dream Line IT Solution and it completely interacts with our API, which allows to automate and manage SSL sales with Dream Line IT Solution in full.
We have a corresponding Knowledge Base category dedicated to module’s general information and configuration settings here. To have a quick access to any required section, use navigation list below:
1. Before you begin
2. Sandbox and Production environments
3. Download and installation
4. Setting up products and pricing
5. Order process and welcome emails in WHMCS
6. Activation of SSL from WHMCS
7. Reissue, renewal and synchronization
8. Debugging and add-on functions
9. Multi-domain certificates
10. FAQs
Need any help? Contact our Helpdesk
About Author
